—I wrote this post a long time ago! This was one of the first projects I ever did with power tools. Enjoy!—
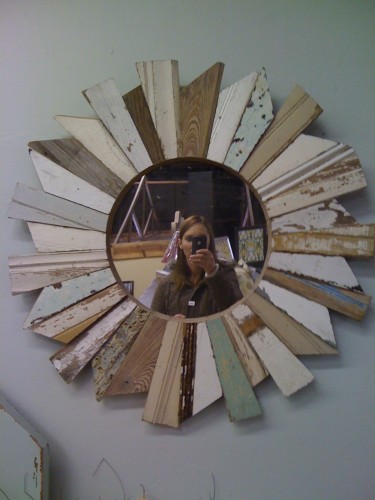
I saw this mirror in a store I love here in Utah, but it was $395.00. I just don’t have that kind of cash right now. I showed the picture to the hubs and he said that “You could totally make that.” “I”, “Me, Lynn” “BY MYSELF” could totally make it. Uhh… what?! He said he would give me tips, but I was pretty much on my own with this one. OK. Hear me ROAR ladies. That’s right, I used the saw, the man tools, and I got crafty with MY BAD SELF!
My sister in-law and I decided we would each make one. SO! Here is how we recreated this beauty.
We started by collecting wood that looked reclaimed, like the wood on the frame. We took some wood out of a friends yard, a few pieces off a really old looking pallet, and went to the Re-Store to buy a few left over pieces of molding. I also bought a 4ft pieces of cedar from Home Depot. We started by cutting the wood boards to 6-9 inches long. We cut the tops off at angles of 20 to 45 degrees. We then used the chop saw and cut angles into the square boards, cutting length wise. This left the top wider and the bottom of the wood more narrow.
We laid out the pieces to see how the boards would fit together and get the look we each wanted.
Then,we cut out all the pieces that would be “kissing.” There are six sets that face each other, or “kiss.” Just like a puzzle, we pieced them together to be the overall size we each wanted.
After this, we numbered them on the back side and then transferred them into my laundry room for painting/distressing.
We used multiple painting techniques to give them each some character and afterwards, used 220 and 100 sandpaper to rough some of the paint up. On 2 of the boards we did a crackle finish, with silver underneath and blue on top. I will explain more about that towards the end of the post. We had a fun time play with different techniques.
Once the paint was dry, I glued the sides of each piece together using wood glue.
It is best to clamp a 2 or 3 together at a time to make a stronger bond.
After it was all nice and glued, I added a few small pieces of thin wood to the back for extra support. This are called shims. You can cut your own on a table saw or buy them at your local home improvement store.
Okay, maybe more than just a few….haha!
I wanted to make it strong. This is the best way I could think of at the time. Since making it I have thought of another option that could also work – It would be to cut a circle out of a sheet of 1/4 or 1/8 inch thick plywood. Then using a nail gun, nail the circle to the back, securing each piece. It might look a little cleaner on the back with one solid board.
Next, I then placed heavy books and paint cans on top of it until the glue was dry.
Once it was dry and strong, I flipped it over to add the mirror. I used a round mirror I had bought from a thrift store. I wrapped the frame of the mirror in jute to get the beachy look I was going for.
I could have glued or nailed the mirror on, but I decided to use some heavy duty Velcro tape. That might seem weird, but it actually works great. And, if the mirror ever breaks or needs to be removed for some reason, I can easily take it off.
I added some picture hanging wire to the back and I WAS DONE!
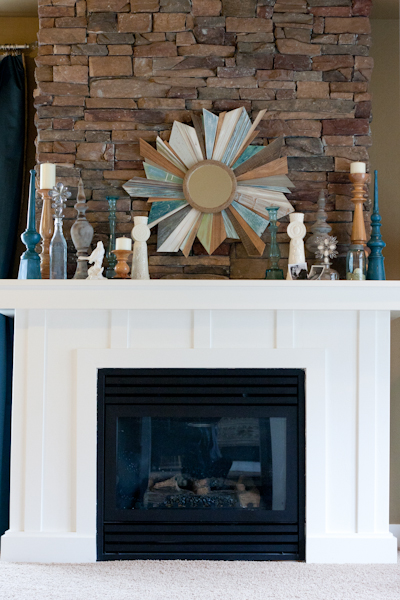
I love the look  It totally goes with my “beachy barn look!” I need to find a better name for that…. any suggestions??
Here it is all done hanging above my bed!
It’s not a perfectly shaped as the one I saw in the store, but I think it adds to it’s charm.
Oh, and by the way! This star-burst mirror did not cost me $395 – it cost me about $10!!!
Here is the crackle technique I mentioned above. I wanted the metallics to be subtle.
Our “painting techniques” mostly involved us painting, sanding, painting more, sanding more.  It was all an experiment- that I think turned out pretty lovely.
On the white boards above I paint a few thin strokes of different colors. After the paint was dry I sanded lightly with 220 sand paper.
The blue boards, I painted a solid blue with a coarse brush. After sanding away some of the light blue, I added a navy blue glaze. Once the glaze was dry I lightly sanded that as well.
A few of the wood boards were left natural or stained with a darker stain or with a white wash.
For finishing touches we distressed some of the boards with a hammer and added a little gold leaf.
Always a project at my house 


I cannot wait till the day that I have the tools to make this!! Dream mirror! Love the mismatched sides so beachy chic! Bucket List!